Planting- All the In's and Out's

It’s time- or it soon will be for most of us to plant our dahlias. We’ve begun the process on our farm this week. Basic planting is a fairly straight forward process but like with all things dahlias- there is always more than one way to do it.

Basic Planting Instructions: (If you’ve planted a dahlia before, skip this part)
Prepare your soil- amend according to soil test instructions. Then add a granular fertilizer with a slightly higher percentage of nitrogen than phosphorus and potassium. If you didn’t soil test, then 1.- Go do it and 2.- You can still go ahead and plant, just add the fertilizer and then add your amendments once you get the test back. It’s easier to add the amendments before planting though so — Get The Soil Test first!
After soil prep, dig a shallow hole. How deep? Depends on your soil type and climate. If you have sandy well draining soil and live where there is moderate rainfall, then 5-6” deep is great. If you have heavy clay soil and you’re still working on your drainage, then plant a generous 1.5” under the soil. This also works if you live in a heavy rainfall climate.
You can lay the tuber on it’s side or place the crown pointing up. But you may not know which end has the crown if you are new to this, so just place the tuber horizontally. The sprout will find it’s way up.
Don’t water immediately after planting. The tuber has enough moisture to get your sprout started and you’ll also get some rain anyways. Extra water is just going to contribute to rotting. If you go 3+ weeks with no rain, then give it a good soak but don’t water again until you see it sprout.
After it’s sprouted 4-5”, then you can water normally- make sure your dahlias get adequate water- not sopping wet but soil shouldn’t get bone dry and cracked between waterings.

Planting- All the Little Bits You’ve Wondered About:
This next section is just a collection of thoughts and answers to questions I see often.
1. I’m planting tubers in a hoop house- when do I begin watering? I plant my tubers inside the hoop, then take a sprinkler and soak the whole house really good once. Then I don’t turn irrigation on until the tubers begin sprouting. I usually wait until about 40-50% of the house has sprouted. You have to simulate rain inside the house to get them going.

2. My tuber has a 3-4” sprout on it, how do I plant it? Just like the instructions above. If you bury the sprout, that’s fine. It will keep growing. Just plant at the depth recommended for your soil type.

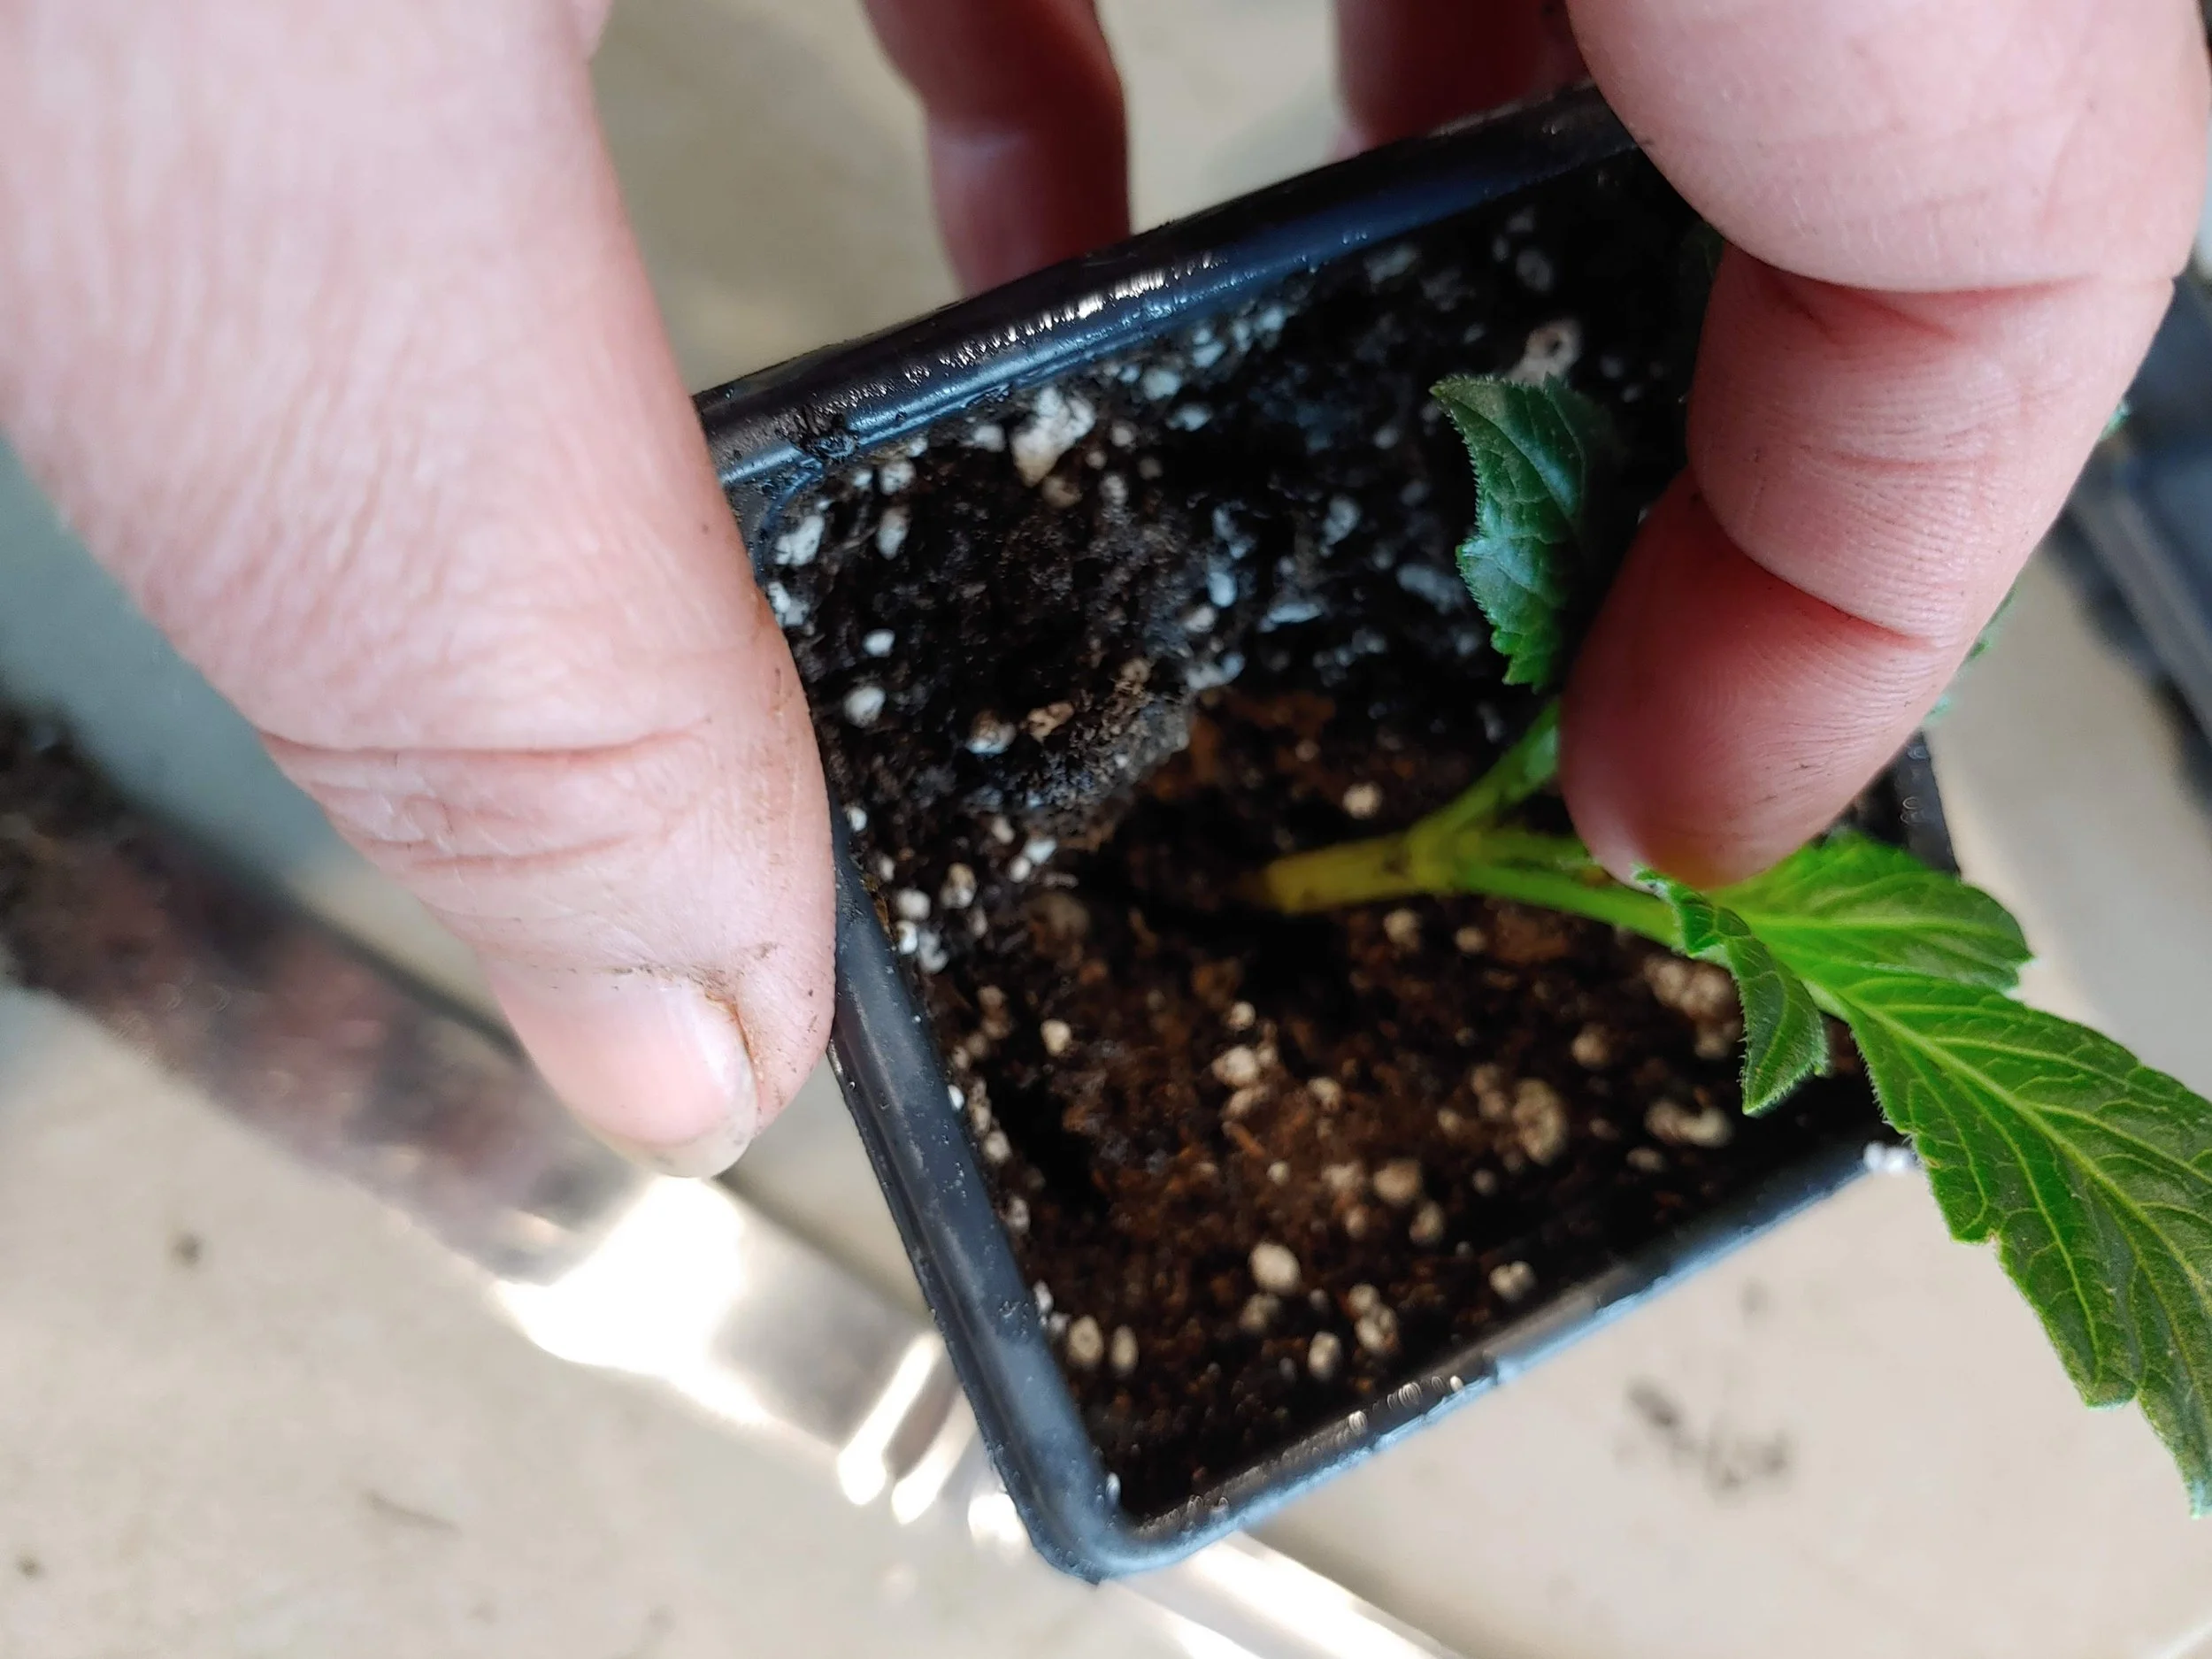
3. I took cuttings off my tubers, can I plant these? Yes- you can still plant tubers you have taken cuttings off of. I like to let my tuber re-sprout before I plant it. It’s just a little extra insurance- I don’t think this is completely necessary, just how I do it. I will cut off some of the sprouts if it resprouts multiples- I don’t leave more than 3. I also make sure these tubers get adequate fertilizer. You’ve taken cuttings off the tuber - which means you’ve removed it’s method for making more food to store up in the tuber. So these get a little extra nutrition at the beginning. Some people don’t plant a tuber they’ve taken a lot of cuttings off of- they feel it’s exhausted. But I think, if it’s still producing sprouts- then give it some good food and it will replenish itself in time. Just another example of how there’s always more than one way to do something with dahlias- This is why they are so much fun!

Re-sprouted pot tuber after a cutting has been taken

4. The sprout fell off my tuber in shipping- what do I do? Plant it. It will re-sprout. You can wait on it to re-sprout before you plant it or just put it in the ground. Either way is going to be fine- it just wants to grow.

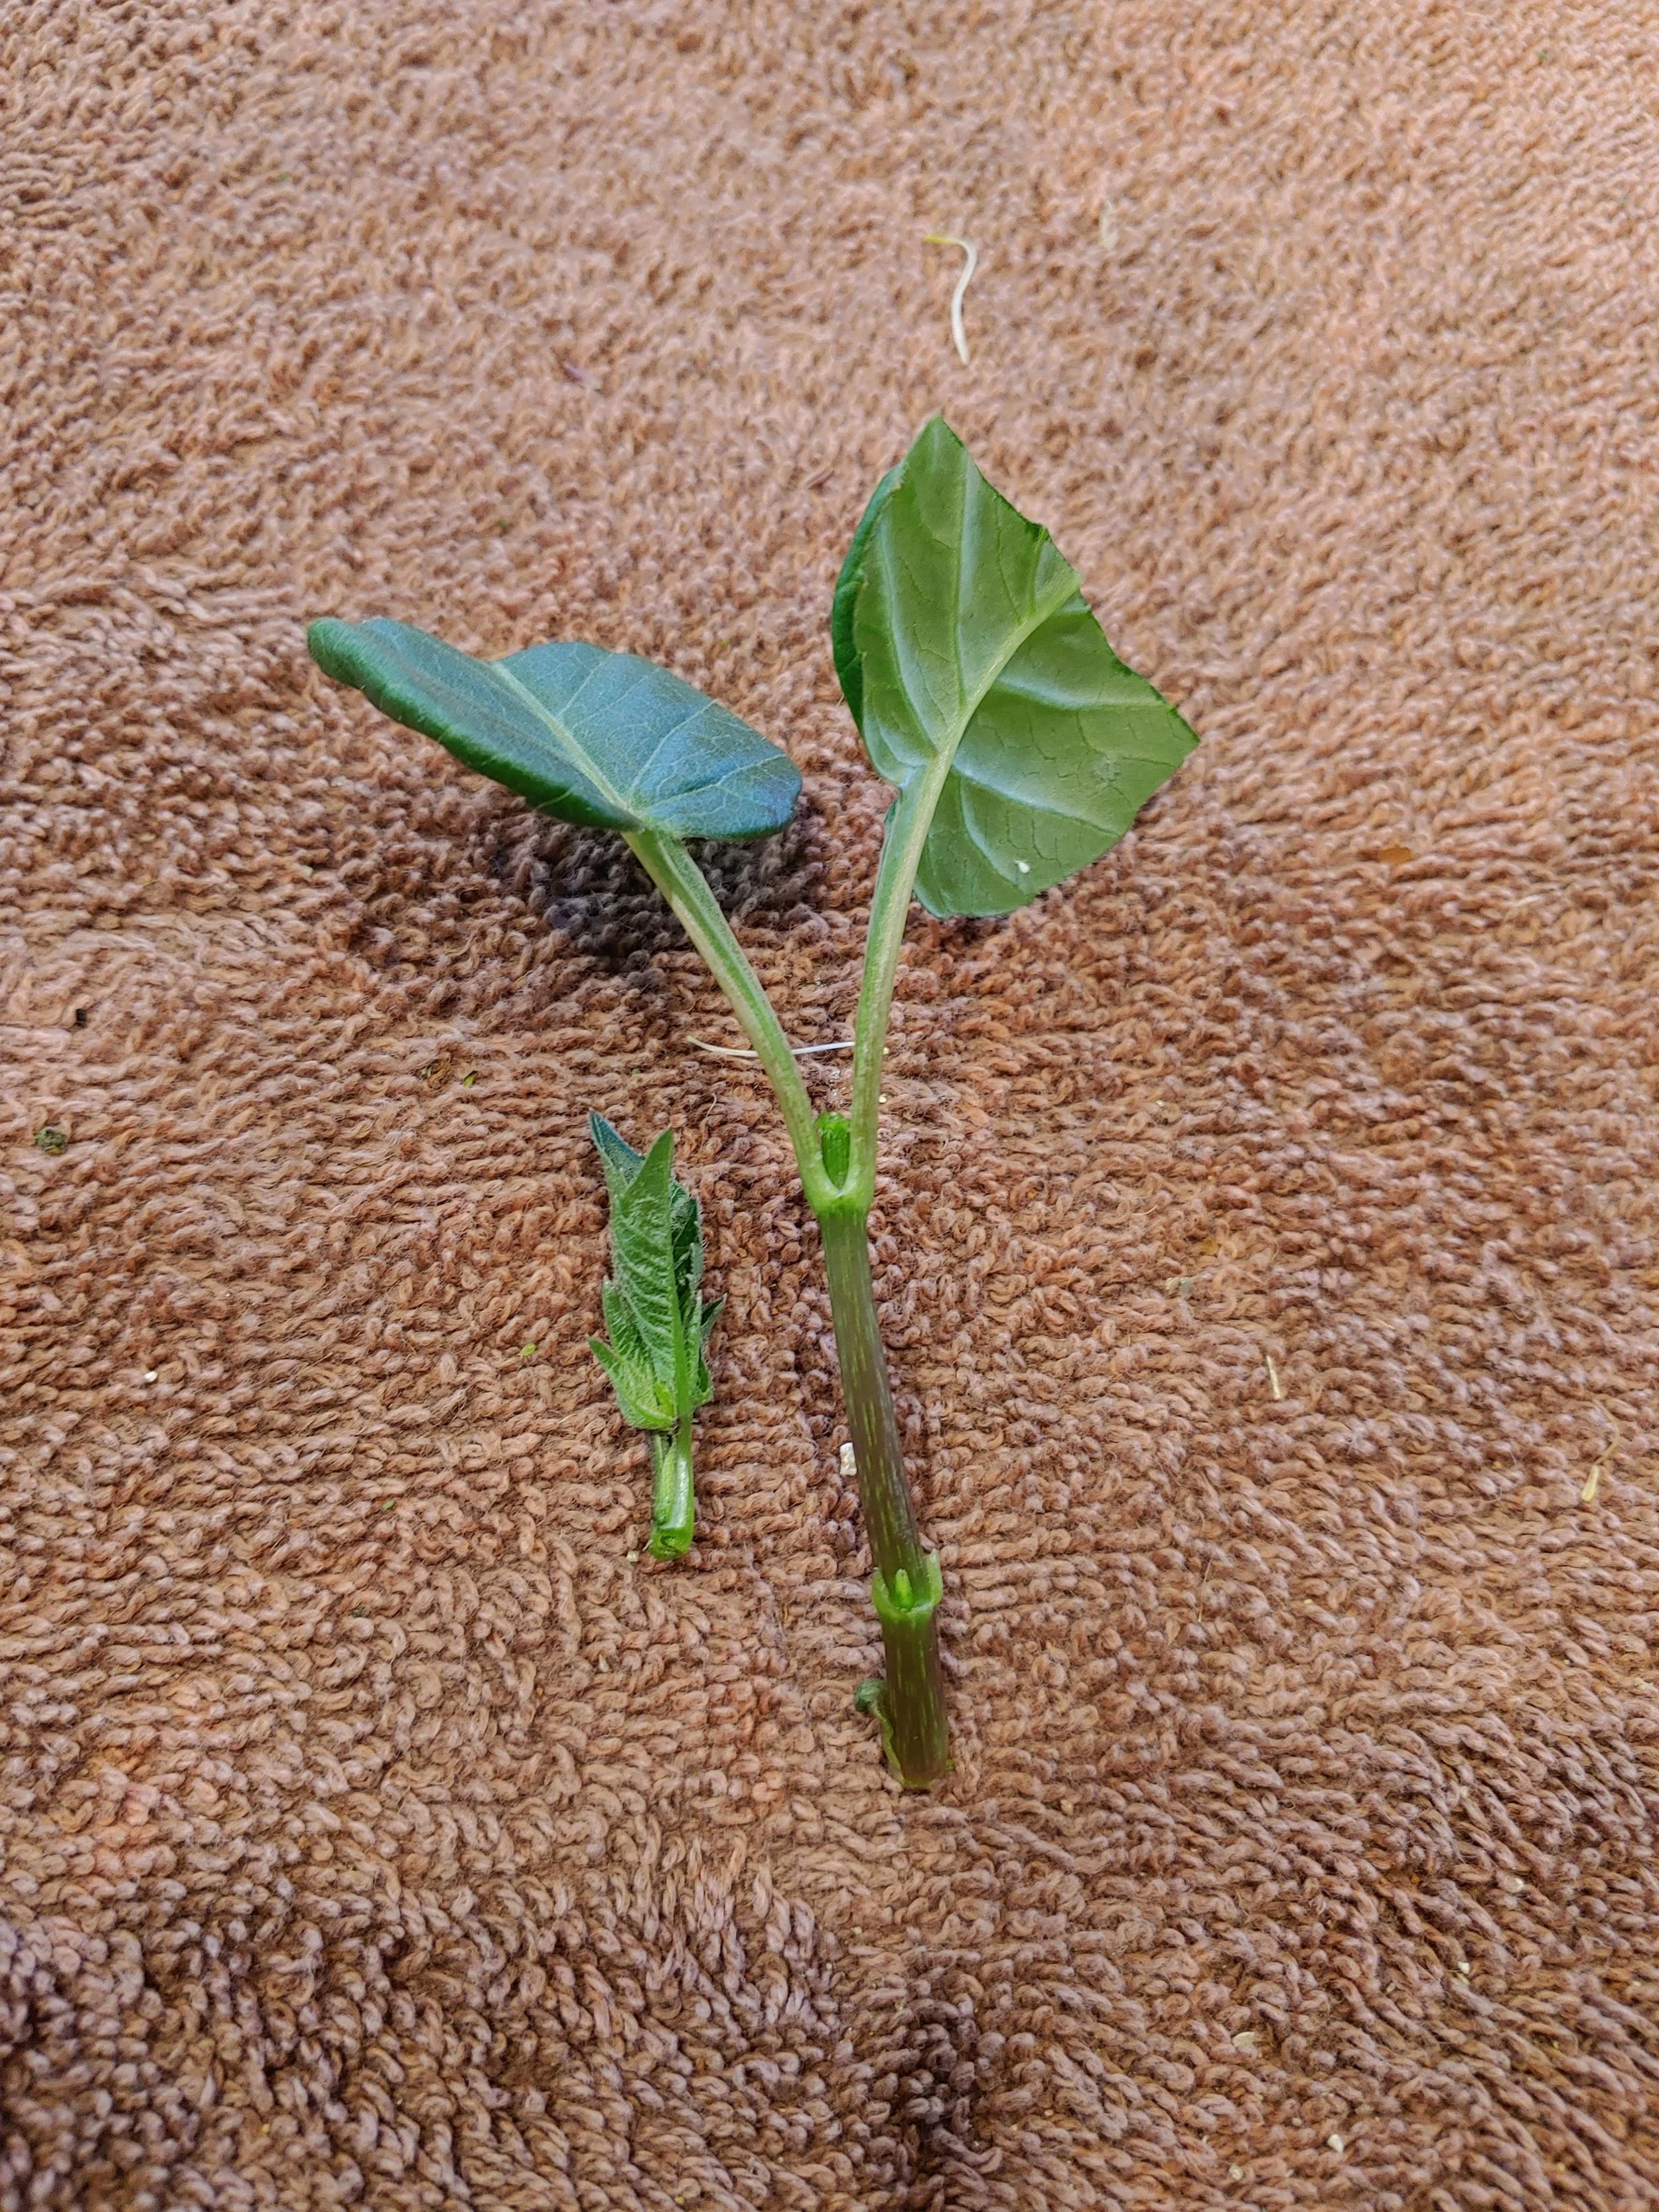
5. My tuber shriveled in storage but I see it beginning to sprout. So- you can just put it in the ground or you can pot it up. I potted up some tubers like this awhile back. They got a little too shriveled for my taste in storage and I wanted to make sure I was going to get a good plant. So I basically turned them into dahlia plugs. Out of 100 tubers, only a small handful (less than 10) didn’t sprout and gave me a great plant. Mostly I like to just plant and not fuss but sometimes a little babying pays off!

Tubers that were shriveled or unsure if they had an eye got potted up into a 50 cell plug tray to create “dahlia plugs”

6. I received a clump of tubers in the mail, can I plant the whole thing? Yes- you can plant the whole thing- at the depth recommended for your soil type (see above). You don’t have to divide, you can if you want but it’s not necessary.

7. The clump of tubers I received has a sprout/eye on the stem. How do I plant it? If the sprout is lower on the stem near where it intersects with the tubers, then plant so that the sprout/eye is under the soil. If it’s really high- several inches up, chop the stem at the base where it intersects with the tubers and then plant the whole clump. Some varieties will eye off an old stem (looking at you Cafe Au Lait!). You don’t see this a lot but it’s not abnormal.

Got any planting questions, drop me a line here and let me know!

Dahlia Cuttings- Part 3

By this point, you’ve potted up your tuber, it’s sprouted and you’ve taken your first cuttings. They’ve been stuck in the rooting medium for a few weeks now.

So it’s time to pot them up. This is probably the easiest and least mystifying part of this whole process. If you’ve made it this far, you’re almost home free!

I like to use small pots- anywhere from a 3” to 5” size. Larger if it’s earlier in the season and the cutting will be growing out longer.

Take your cutting tray and gently pull at each sprout. If you feel resistance like you can’t easily pull it out— chances are that it has some roots. I like to use a butter knife to get them out of the plug tray. (if you used a small pot to begin with you can skip the potting up stage).

The cutting on the left has the minimum amount of roots that I want to see before I begin potting up. The cutting on the right needs another week.

Place some good potting mix in your pot, and then hollow out a small depression- about as deep as your plug tray cell. Dig the cutting- roots and all out of the tray with the butter knife. Make sure you’ve got decent roots on it— like a few white fat roots- 2-3” long. if the roots are tiny, give it another week before planting up.

Pop it into the depression in your pot, gently pat a bit of soil around it to stabilize it and firm it in. Water gently and thoroughly— It’s important that the roots and the surrounding soil have an even wetness at this stage. You don’t want any dry soil pockets or huge air pockets around your roots. Good soil to root contact!

Don’t forget to transfer your label from the plug tray!

Place the pot back on your heat mat if using and under your grow lights for another few weeks. Once it’s fully rooted into your pot, then transition it outside and begin to harden it off. If you are frost free, you can place under the grow lights for a few days and then finish the growing period outside.

To harden off, place the plant in a shady spot for a few days, then gradually move it to more sun. The process usually takes about a week.

After you’ve hardened off your plant and you are frost free for the season, it’s time to plant your dahlia in the garden!!

Congrats you’ve successfully multiplied your dahlias! And who doesn’t want more dahlias!!

BTW— Most likely that cutting is going to produce flowers faster than the tuber!

Also- you can still plant your tuber even after you’ve taken cuttings off it. I like to let them re-sprout to a few inches tall and then plant like normal.

Buying Rooted Cuttings:
Since buying dahlias as rooted cuttings is becoming more and more of a “thing” I thought it would be a good idea to discuss the process of how to handle them.

You’ll receive in the mail a small plant that has been rooted into a plug size rooting medium- may be a potting mix, an elle pot, or possibly formed peat moss plug often called Root Riots (shown below). Upon arrival, you’ll want to pot these up- do this within 24 hours, the sooner the better. If you have to wait a day, make sure the plugs are staying moist.

There may even be some yellowing leaves at the bottom of the plug- that’s okay. The plant has used what it needed from those- just remove them. Also it may have curved a bit while in the box- it’ll straighten out.

After potting up into a small pot (like the process described above), place the cutting out of strong light- remember it’s been in a box. You need to harden it off gradually and re-acclimate it to the light. You can place it under grow lights if it’s still cold outside or grow it on outdoors if weather permits. You’ll need to grow it on about 3-4 weeks depending on your pot size before planting into the garden.

Fertilizer- it’s important to fertilize your cuttings. They’ve been growing in a very small amount of space and have most likely exhausted the food in their plug so give them some love. A fertilizer high in nitrogen and a bit of phosphorus and potassium- a good liquid feed will work.

After you’ve got a fully rooted plant, it’s time to plant in your garden. Dig a hole- a bit deeper than your pot. You want to remove the lowest pair of leaves on your plant. Then plant it deep enough so that the node where those leaves where is underground. This will increase the number of tubers you get off the plant. (And yes it will form tubers and bloom in year 1).

You’ll see flowers around 2-3 weeks faster from a rooted cutting b/c they have a bit of a head start over a planted tuber.

Dahlia Cuttings- Part 2

For part 2 of this series, we are jumping forward about a month- that’s how long it will take until you see the tubers beginning to sprout. It’ll go a bit faster the later you start them in the spring but normally it’s around a month before you have sprouts big enough to take a cutting. Generally speaking you want to have around 10-12 weeks to go through this process so start about 2.5 months before you want to plant.

Alright- you’ve potted up your highly coveted tuber varieties and now they are beginning to sprout. It’s time to take the cuttings.

Wiggle the shoot back and forth until it snaps off from the tuber. I used to take cutting twice this size and use snips or a knife to remove them. But I learned (Thanks Drew at Clara Joyce) that the smaller shoots root better and snap off easier- this way is faster to get your cuttings but also faster to root. I’ve had much higher success rates since I started this method.

If you are using a larger cutting like shown here, remove some of the foliage so that the rootless cutting doesn’t have as much leaf surface to support. You need enough to photosynthesize with but not so much that it is constantly wilting.

Take a pencil, bamboo skewer, etc. and make a hole in your potting soil. I like to use a 72 plug tray but a small pot would work well. Small pot as in 2-3”, don’t go any bigger than that right now, smaller if you can.

Dip the cutting into rooting hormone if you like. I would try some with rooting hormone and some without- I’ve done both ways. I personally like rooting hormone. As for brands— look for the ones with cannabis plants on them. Cannabis growers do lots of cuttings so they usually know their stuff when it comes to rooting. You want to pre-poke the hole so your rooting hormone doesn’t rub off while you poke the cutting in. I’ve been using Hormodin 3 this year with great results.

As for rooting mediums- there are options: potting soil, sand, perlite, etc. You need something very light- stay away from straight compost. Free draining is good. Some potting soils work great, but some hold too much moisture. We’ve been using a product called “Elle Pots” this year. They are a paperlike sleeve filled with peat and perlite. They’ve been holding the moisture level very well. I’d love to find a peat alternative though (if you know one - holler!)

Place your cutting into your pre-poked hole, label it!! Make sure you label it- I use vinyl blinds written on with pencil. That will last all season if needed. Then place a humidity dome on top or use a plastic bag if you are rooting into a small pot.

I feel like I should put this next part in all caps- not because I want to yell but because it’s really important!

Rooting anything is all about conditions and timing. Taking the cutting at the right stage of growth- which fortunately isn’t too finicky with dahlias is important (mostly this is an issue with woody shrubs). The conditions after you slice the shoot from the tuber are important! Essentially you are putting the plant on life support until it grows roots. So you gotta’ pay attention. Your powers of observation are your most important tool here. Observe how wet the soil is, how dry, how warm, how cold. Humidity around the cutting needs to be high. Humid environment is going to be your best chance for success until you get some roots going. Most dahlias take around 2 weeks to begin to show roots.
You can use a heat mat if you have one, if not, go for a warm spot—needs to be around 70 degrees. The soil temps needs to be around 70- so a warm room or a heat mat will work. We used a warm room this year because I didn’t have enough heat mats for the amount of cuttings we took. I encased a portion of my basement in plastic and then put a small space heater in there with a temperature gauge and it worked great!

Check your cuttings at least twice a day until you get used to your rooting environment conditions. Make sure that humidity is staying high. Rooting media should be moist but not soaking wet. Too wet and it will rot. The cutting will tell you but you have to pay attention. This is not plant it and forget it gardening. This is— baby it with all you got!!

Also make sure you are giving the plant light! You don’t have to have a fancy grow light. I’ve used shop lights for years but it needs a concentrated source of light. After about 10 days, give the cutting a little tug and see if it’s rooted. After 2-3 weeks, you can pot it up into a bigger pot until it’s time to plant out. I recommend a 4-6” size pot.

Lastly, let’s talk about expectations. If it’s your first time or even if you’ve tried a bit before- Don’t expect it to work perfectly. Rooting plants is loads of fun but it’s also a learning process. I find plant propagation one of the best parts of my job. But I’ll admit it took a while to learn to do it. And I still have cuttings that don’t root. Plants are natural things and we don’t have complete control over them so sometimes it’s just not gonna work. You’ll never get 100% success. Don’t beat yourself up over it. Stop and take inventory of the situation— figure out what worked and what didn’t and try again.

The good news—- that tuber is gonna make another sprout where you just cut one off— in fact, it’ll probably make two!!

PS- Here’s Part 1 in case you missed it!

Dahlia Cuttings- Part 1

We all wish we could have more of the most coveted varieties! However, if you have at least one viable tuber- You Can! This is the first in a multi-part series on dahlia cuttings. Part 1 is all about getting your tubers sprouted. There are of course many ways to do this but here’s my take.

I take a 1020 tray with a webbed bottom insert. I like to double layer my tray like this because this means I can drain off any extra water. It’s easy to rot tubers during this process so you want to keep a close eye on how much water you are using.

Fill the tray with moist but not wet potting mix or a seed starting mix— either will work. You just need a medium that will hold moisture. I’ve seen some people use sand. I like it moist enough that just a little bit of water comes out when you squeeze a clump in your hand.

Inspect your tubers for any signs of leafy or crown gall. Ideally you would have gotten rid of those tubers in the fall while digging but we all miss things sometimes. Also I tend to separate tubers from my farm and those that are new from other farms for the year. You definitely want to have some viral and disease awareness at this stage and separating your stock helps a lot. At the end of you season, if you know you want to take cuttings of a variety, it’s a good idea to virus test it before you frost out for the season.

Insert your tubers with the necks facing up. You want at least an inch or two of the tuber bottom covered with dirt. Make sure you can see your label or add a label in the tray. Arrange them so you can get to the neck/crown area easily to pull your cuttings when they sprout.

You can get a fair bit of tubers in one tray. If you aren’t needing to root a lot, you can pot them into individual pots. Anything that drains and holds soil will do!

Now place your trays on a heat mat set to 65-70ish. It’s also helpful to go ahead and set up your grow lights so that as soon as they begin to sprout, they’ll have the light they need. If you don’t have heat mats, bring the tubers into your house. Most homes are warm enough during this time of year to get them sprouting. I’ve also put them in a small room with a space heater to get the temp to 70. This gets them started to sprout fairly quickly. Within 3-4 weeks, you’ll begin to see the first sprouts. Some varieties can take 6-8 weeks, so don’t give up on them. Keep the soil moist but on the dry side of moist. I let mine get pretty dry before I water again.

This is Rock Run Ashley— one of my greatest rooting successes! I started with 2 tubers several years ago. Grew those out and then multiplied those into well over a hundred within 2 years via cuttings. Cuttings are an easy and fun way to multiply your stock.

I’ll be back soon with the next steps in the process!

What To Do With Over-Wintered Dahlia Plants?

Winter of 2020-2021, I over-wintered some tubers in the ground for the first time. And— I really learned some things. Fast forward a few years and I decided to do it again this past year. I wanted a chance to fix the mistakes I made.
We still dig 95% of our tubers since we sell them each year. However, over-wintering in the ground really helps my perspective when talking dahlias with a lot of you. Most of the home gardeners in my area leave their tubers in the ground. We don’t freeze hard enough for the ground to freeze solid. As long as you have good drainage, your tubers will do just fine in the ground. (Zone 7b-8a, South Carolina) In fact, I recommend most people leave them in unless they have a temperature and humidity control storage environment.

A Bed of Dahlias From mid April 2021

Overwintering in the ground works pretty reliably in Zone 7 and above. Some zone 6 can do it. Occasionally I hear about a zone 5 but that takes some work and I wouldn’t risk it.

So when you overwinter, your tubers will begin to sprout once your ground gets warm enough. We overwintered in 2 different environments- on our farm in a cooler than average spot. The second was our off farm plot that sits high and very open to the wind. In early March I began checking to see if they were resprouting. I found our off farm plot was already greening up when I removed the tarp. This location gets full sun all day so the soil is a bit warmer even though it is more exposed. It runs warmer when the suns out but much colder on a freezing night than our home farm.
The home farm area sits between 2 hoop houses so has wind protection but that also means a bit of shade and gets enough sun to grow dahlias but not 100% all day full sun. So in early March, those tuber clumps were still slumbering when we removed the tarp. I noticed that this week (3 weeks after removing the cover) they were beginning to sprout.
*** Side Note— Do you have to use a tarp to cover during the winter? No- We used one for several reasons: weed control. We needed to kill off some weed pressure on the off farm plot. We also needed to be able to control how much water was getting in because that plot doesn’t have as good of drainage as our on farm plot. (in fact, we lost about 50% of one variety on that plot) As long as you planted in an area with good drainage, I’d recommend a bit of mulch and that will work just fine in the home garden. ***

Now- you’ve probably already thought— It’s March- do you really want your tubers sprouting then? Well no- but it’s not the end of the world and when you leave them in the ground, you have to roll with the punches. So I’ve been taking pictures over the past few weeks of what’s been happening:

The above pictures are from right after we removed the tarp from the off farm plot. You can see how the tips got a bit burned from not getting the tarp off sooner. But I didn’t worry about it because I knew we had a frost coming.

after an early Spring Frost

When you let your tubers sprout naturally, you are probably going to have a frost that knocks them back at some point. So I just let it happen because I knew they’d resprout.

Resprouted tuber after a spring frost

This picture above is about 8-10 days after the frost picture. It doesn’t take long. They may go frosty again- we are still 3 weeks from our last frost date. But it’s okay because I know they’ll resprout again.

The first time I over-wintered, I covered with frost cloth each time we got a Spring frost. But I learned that was just extra work- they are going to do what the weather tells them. And once we level off temperature wise, they will grow like crazy!

So what do we do with these dahlias once they sprout and stay sprouted? Fertilize!!! This was a major mistake I made the first time I over-wintered. I didn’t fertilize early enough. Once they are sprouted, begin your fertilization. They need food- they are hungry after that long winter’s nap!
Also make sure to re-install any support structures if you removed them throughout the winter. They will need them sooner than you think.

Lastly- the question I always get: So if I over-winter in the ground, should I divide my tubers and if so how often?
For years, leaving tubers in and rarely dividing was the norm. However— in this day and age of virus potential in dahlias, I think it’s good to check your tubers often. So I recommend digging up your tubers at least every other year to check for gall diseases (crown and leafy). It’s hard to tell above the surface if you have these. You can then divide or just put the clump back into the ground. If you are introducing a lot of new varieties each year, I would check more often- I’d dig your clumps each spring, inspect and then replant.

Yes- I know this is extra work but it will go a long way to keeping your plants healthy!

So go check those clumps— hopefully you’ve got some green sprouts! If you need help dividing your tubers, come join our workshop on April 13- Dahlia Dividing and Planting. It’ll be a morning of exploring the beauty of Spring on a flower farm and learning how to divide your tubers like a pro! Sign up Here!